[Metal] MSL(Metal Shading Language)에 대하여
Metal의 쉐이더를 작성하기 위해 필요한 MSL에 대해 정리했습니다.
이 글을 보기 전에 이전 포스팅을 먼저 보면 좀 더 이해가 잘 될 수 있습니다.
[Swift] Metal에 대해 알아보기
Metal을 공부하면서 정리한 내용입니다. Metal은 GPU에 접근할 수 있는 기능을 제공하여 빠른 그래픽 처리를 가능하게 하는 API입니다. OpenGL ES와 유사하지만 크로스 플랫폼이 아니라는 차이가 있고,
jintaewoo.tistory.com
개요
Metal에서 쉐이더를 작성하려면 MSL(Metal Shading Language)을 사용해야 합니다.
쉐이더에서는 그래픽(vertex, fragment) 및 컴퓨팅(kernel) 처리를 할 수 있습니다.
렌더 파이프라인
렌더 파이프라인은 드로잉 명령을 처리하고 렌더 패스의 대상에 데이터를 출력합니다.
렌더 파이프라인은 여러 단계로 구성 되어 있지만, vertex, fragment를 제외한 나머지 단계는 모두 작성되어 있습니다.
때문에 vertex, fragment 함수만 직접 구현해서 사용하면 됩니다.

- 렌더링을 시작하려면 vertex 데이터가 필요합니다. MTLRenderCommandEncoder 객체를 통해 vertex 데이터와 인덱싱 정보를 보내줍니다.
- Vertex 처리 단계에서는 전달받은 vertex 및 color 데이터의 처리에 대한 코드를 작성합니다.
- 래스터 단계에서는 2D 기하학적 데이터를 2D 픽셀로 만들고 vertex를 연결한 모양의 픽셀을 채웁니다. 이 데이터는 Fragment 함수로 전달합니다.
- Fragment 처리 단계에서는 래스터화 된 각 픽셀의 색상을 결정합니다.
vertex 및 색상 데이터를 사용하여 삼각형을 그리는 코드를 위 단계대로 작성해 보겠습니다.
1. vertext 데이터 입력
vertex 및 color 데이터를 파이프라인에 전달하는 코드입니다.
각 꼭지점 별로 색을 설정해 줍니다.
let vertexData: [Float] = [
  0, 1,
  -1, -1,
  1, -1
]

let colorData: [Float] = [
  1, 0, 0, 1,
  0, 1, 0, 1,
  0, 0, 1, 1
]

let vertexDataSize = vertexData.count * MemoryLayout<Float>.size
vertexBuffer = device.makeBuffer(bytes: vertexData,
                                 length: vertexDataSize,
                                 options: [])

let colorDataSize = colorData.count * MemoryLayout<Float>.size
colorBuffer = device.makeBuffer(bytes: colorData,
                                length: colorDataSize,
                                options: [])

commandEncoder.setVertexBuffer(vertexBuffer, offset: 0, index: 0)
commandEncoder.setVertexBuffer(colorBuffer, offset: 0, index: 1)
colorData는 rgba 값을 나열한 것이고, vertexData의 숫자는 무엇을 의미하는지 알 수 없습니다.
먼저 vertex의 좌표 시스템에 대해 알아 보겠습니다.
vertex 좌표는 아래 그림과 같이 Normalized device coordinates (NDC) 시스템에 의해 표시됩니다.
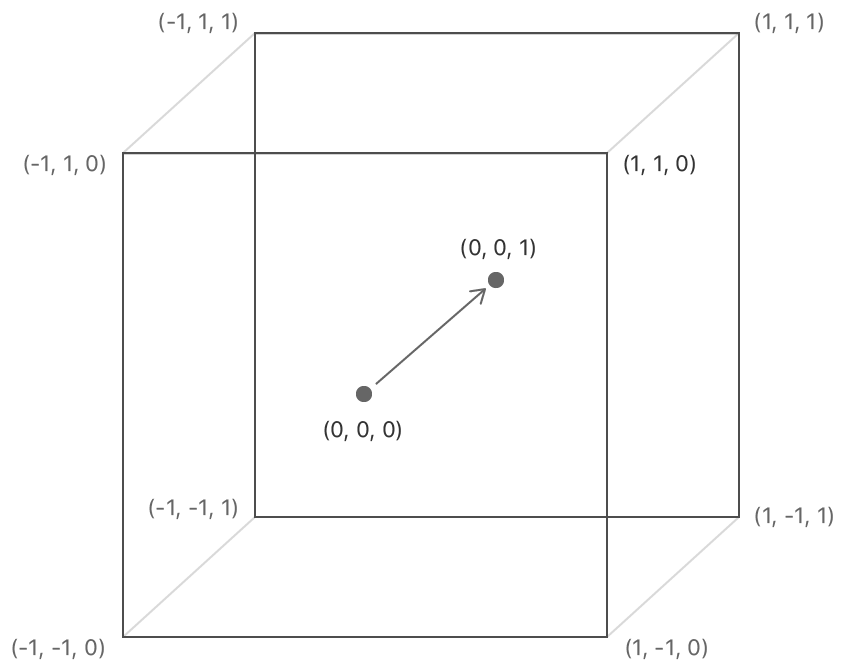
4차원 벡터 (x, y, z, w)를 사용하고, 위와 같이 3D 공간 좌표로 표시됩니다.
여기서 w는 원근법에 대한 값인데, 값의 변화에 따라 멀고 가까운 정도를 표현할 수 있다.
(x, y, z) = (x/w, y/w, z/w)위와 같은 공식으로 w에 대한 값이 3차원 좌표 값에 반영된다고 합니다.
여기서는 평면에 삼각형을 그릴 것이기 때문에 3D 좌표를 2D로 생각하면 아래와 같습니다.
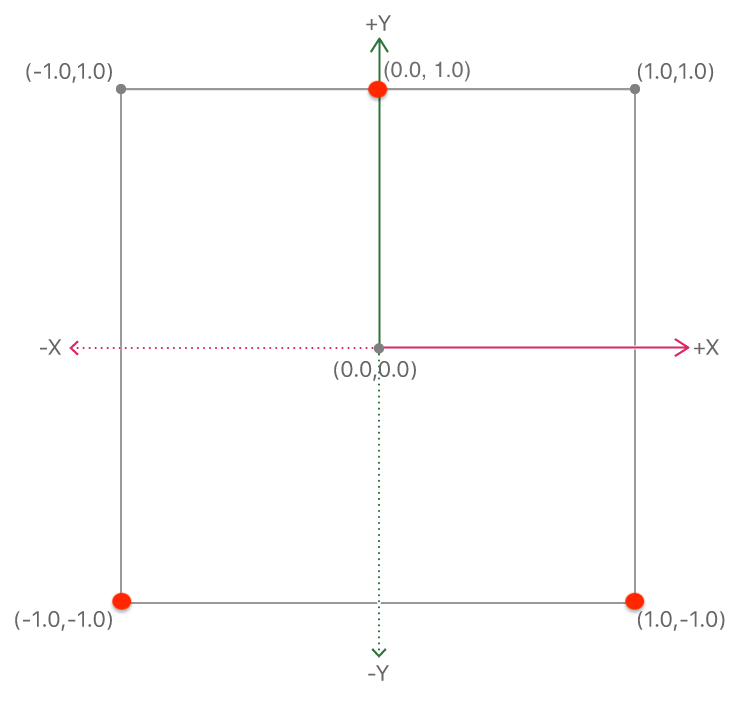
그림에 빨간색 점의 좌표를 보면 vertextData의 좌표와 같은 것을 볼 수 있습니다.
이를 기반으로 좌표를 설정해서 2D, 3D 등 원하는 것을 그릴 수 있습니다.
2. Vertex Function
vertex 함수에서는 전달받은 vertex 및 color 값을 필요에 따라 변환한 후, 래스터화 단계로 데이터를 전달합니다.
아래는 추가적인 변환 없이 값을 전달한 코드입니다.
[[position]], [[buffer]] 같이 파라미터 및 변수에 붙는 속성 한정자는 아래 부분에 정리 하였습니다.
struct RasterizerData {
  float4 position [[position]];
  float4 color;
};

vertex RasterizerData vertexPassThrough(const device packed_float2* vertices [[ buffer(0) ]],
                                const device packed_float4* colors [[ buffer(1) ]],
                                unsigned int vertexId [[ vertex_id ]])
{
  RasterizerData outData;
  outData.position = float4(vertices[vertexId], 0.0, 1.0);
  outData.color = colors[vertexId];
  return outData;
}
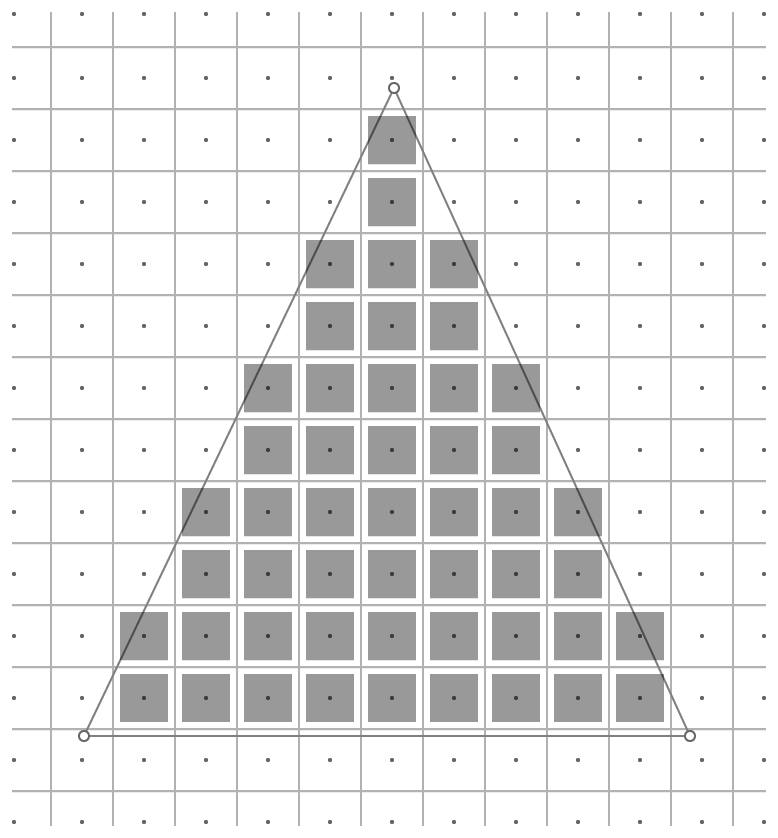
3. Rasterization
래스터 단계에서는 화면을 픽셀로 변환하고 전달받은 vertex를 연결한 모양의 픽셀 부분을 채웁니다.
아래는 삼각형 모양의 vertex 데이터를 연결한 부분의 픽셀만 채워져 있는 그림입니다.
4. Fragment Function
fragment 함수에서는 래스터화 된 데이터를 받아서 각 픽셀의 색상을 결정해 줍니다.
아래는 전달받은 색을 변화없이 출력해 주는 코드입니다.
fragment float4 fragmentPassThrough(RasterizerData data [[stage_in]]) {
  return data.color;
}
여기까지 진행했으면 파이프라인을 통과하여 적용된 값들이 출력될 것입니다.
삼각형을 그리는 예제를 진행했으니 삼각형이 출력될 것입니다!! 👏👏👏
속성 한정자
[[ position ]]
float4 타입의 좌표 (x, y, z, w)를 나타냅니다.
[[ buffer(index) ]]
vertextBuffer를 설정할 때 인덱싱한 값을 읽어 들입니다.
아래 코드를 보면 버퍼를 설정할 때 인덱싱하고, 해당 인덱스를 사용하여 파라미터로 읽어 들이는 것을 볼 수 있습니다.
commandEncoder.setVertexBuffer(vertexBuffer, offset: 0, index: 0)
commandEncoder.setVertexBuffer(colorBuffer, offset: 0, index: 1)

vertex RasterizerData vertexPassThrough(
  const device packed_float2* vertices [[ buffer(0) ]],
  const device packed_float4* colors [[ buffer(1) ]],
  unsigned int vertexId [[ vertex_id ]]
)
{
  // do something..
}
[[ vertex_id ]]
ushort 또는 uint 타입의 vertext 인덱스를 나타냅니다.
[[ stage_in ]]
vertex 및 fragment 함수의 파라미터에 사용되며 구조체로 캡슐화된 데이터를 가지고 있습니다.
struct RasterizerData {
  float4 position [[position]];
  float4 color;
};

vertex RasterizerData vertexPassThrough(
	const device packed_float2* vertices [[ buffer(0) ]],
	const device packed_float4* colors [[ buffer(1) ]],
	unsigned int vertexId [[ vertex_id ]])
{
  RasterizerData outData;
  outData.position = float4(vertices[vertexId], 0.0, 1.0);
  outData.color = colors[vertexId];
  return outData;
}

fragment float4 fragmentPassThrough(RasterizerData data [[stage_in]]) {
  return data.color;
}
코드를 보면 vertex 함수에서 구조체 RasterizerData를 만들어서 전달합니다.
fragment 함수에서는 stage_in 속성을 사용하여 받은 데이터가 변수 data에 매핑되서 color 값을 얻을 수 있습니다.
[[ attribute(index) ]]
vertex 함수에서 stage_in으로 데이터를 읽을 때 사용되는 속성입니다.
이 속성을 사용하면 특정 버퍼에 대한 포인터를 가져오는 대신 attribute에 인덱싱 된 값을 사용할 수 있습니다.
struct Vertex {
  float4 position [[attribute(0)]];
  float4 color [[attribute(1)]];
};

vertex RasterizerData vertexPassThrough(
	Vertex verties [[ stage_in ]],
	unsigned int vertexId [[ vertex_id ]])
{
  RasterizerData outData;
	outData.position = vertices.position[vertexId];
  outData.color = vertices.color[vertexId];
  return outData;
}
[[texture(index)]]
textureBuffer를 설정할 때 인덱싱한 값을 읽어 들입니다.
이 파라미터는 fragment 함수에서 읽습니다.
fragment half4 fragmentPassThrough(texture2d<float> diffuseTexture [[texture(0)]]) {
  // do something..
}
[[sampler(index)]]
텍스처 데이터에 액세스하는 방법을 정의하는 샘플입니다.
commandEncoder.setFragmentSamplerState(sampler, index: 0)

fragment half4 fragmentPassThrough(sampler s [[sampler(0)]]) {
  // do something..
}
[[threadpositionin_grid]]
그리드에서 스레드의 위치입니다.
Reference
https://medium.com/@shoheiyokoyama/whats-metal-shading-language-msl-96fe63257994
What’s Metal Shading Language (MSL)?
Processing executed in parallel on the GPU can use a Shading language called Metal’s original Metal Shading Language (MSL).
medium.com
https://developer.apple.com/documentation/metal/using_a_render_pipeline_to_render_primitives
Using a Render Pipeline to Render Primitives | Apple Developer Documentation
Sample Code Using a Render Pipeline to Render Primitives SDKs iOS 10.3+tvOS 10.2+macOS 10.12+Xcode 11.3+ OverviewIn Using Metal to Draw a View’s Contents, you learned how to set up an MTKView object and to change the view’s contents using a render pass
developer.apple.com
https://www.raywenderlich.com/728-metal-tutorial-with-swift-3-part-2-moving-to-3d
Metal Tutorial with Swift 3 Part 2: Moving to 3D
In this second part of our Metal tutorial series, learn how to create a rotating 3D cube using Apple’s built-in 3D graphics API.
www.raywenderlich.com